
Getting Started
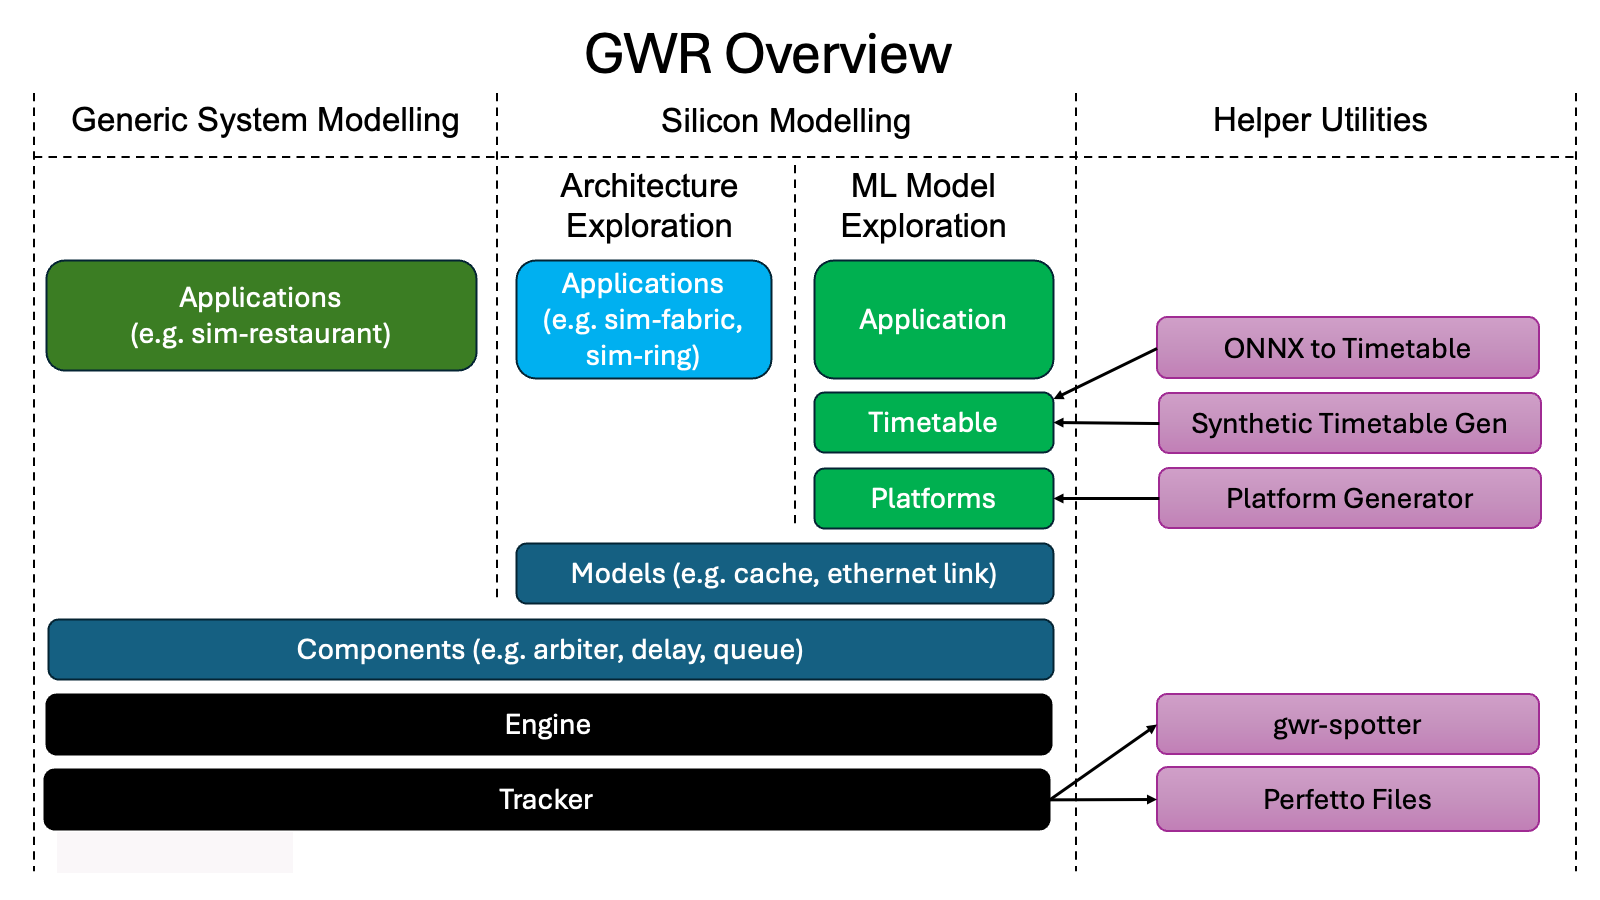
Welcome to the GWR project. The core GWR packages are developed as a monorepo, which together provide the following functionality:
- An event-driven simulation engine.
- Logging and log viewing system.
- Hierarchical configuration support.
- Documentation tooling.
- A library of components and basic models.
- A set of application examples.
Simple simulation example
This example shows how the GWR engine and components can be used to create a simple simulation. This simulation connects a source, which will transmit 10 objects, to a sink, which counts the number of objects it receives.
use gwr_components::sink::Sink;
use gwr_components::source::Source;
use gwr_components::{connect_port, option_box_repeat};
use gwr_engine::engine::Engine;
use gwr_engine::run_simulation;

fn main() {
  let mut engine = Engine::default();
  let clock = engine.default_clock();
  let mut source = Source::new_and_register(&engine, engine.top(), "source", option_box_repeat!(0x123 ; 10));
  let sink = Sink::new_and_register(&engine, &clock, engine.top(), "sink");
  connect_port!(source, tx => sink, rx)
      .expect("should be able to connect `Source` to `Sink`");
  run_simulation!(engine);
  assert_eq!(sink.num_sunk(), 10);
}
Why GWR?
GWR aims to provide a complete modelling workflow, supporting silicon chip and system architecture projects from the initial exploration phase, through more detailed evaluations, and finally to a full specification and golden reference quality model.
Async language features are utilised to allow expressive description of physical world parallelism. An asynchronous runtime executor is included within the gwr-engine package for this purpose, which supports both event-driven and clocked modelling.
GWR is designed with scalability in mind, with the aim being to enable both high accuracy/detailed simulations and large scale simulations in a tractable timeframe. To meet this goal it is therefore important that both the development of models using GWR, as well as the execution of these models is efficient. A developer guide covering the use of the GWR for modelling, as well as API documentation for each package is included. The general philosophy adopted is to raise errors as early as possible for developers, so as many as possible will be at compile time rather than run time, as well as to guard against common errors such as unconnected or misconnected model components where possible.
Built-in support for external documentation tooling allows for the creation of a single source of truth which contains both the readable specification and the executable model. Where appropriate sections of specification and the reference model for that part of the specification can reside within the same source file if desired.
Continuous integration is run on both Linux (Ubuntu LTS) and macOS to ensure ongoing compatibly with whichever platform developers wish to use. A robust release process is also defined to guarantee semantic versioning of packages and automated generation of release notes ensuring user upgrade processes are as smooth as possible.
GWR is written in Rust and takes advantage of a number of the features it offers. In brief summary these are the strong typing system and emphasis on correctness in Rust, excellent and easy to use tooling and build system, and excellent runtime performance (which we have found to be on a par with C++). More information on this, and guides to help get started with the language are included in the Rust chapter of the developer guide.
Concepts
At the core, GWR lets you describe:
- Tasks that model independent activities.
- Data objects that represent information or physical items moving between tasks.
- Events that wake tasks up.
- Clocks that advance simulated time.
- State such as queues and data stores that create contention.
- Metrics and traces that give visibility of what happens in the model.
Core Building Blocks
Tasks
Tasks are the concurrent parts of the model implemented as async functions. They wait for data, time, or a signal, then perform some action or update state which may trigger other tasks.
Data
Simulation objects model data that is acted on by tasks.
Events
Events provide the wake-up mechanism between tasks. They are useful for notifications such as “task complete”, “data is ready”, “time reached” or “space is available”.
Clocks
Clocks make modelling time explicit as tasks choose when they want to wait for time to advance a number of clock ticks to represent actions that take time.
State
Queues and data stores are examples of state that handle data that the tasks act on.
Metrics
A model can emit log messages and trace data to help inspect why a result occurred, not just what the final totals were. These can either be written textually to console, a space efficient binary format, or inspected with tools like Perfetto.
Applications
This chapter gives an overview of how to write a top-level application.
Create the Engine
The first thing to do is to create a simulation Engine:
use gwr_engine::engine::Engine;
fn main() {
#[allow(unused_variables, unused_mut)]
let mut engine = Engine::default();
}
The engine provides the top-level entity for the simulation that must be used as the parent to top-level components.
Instantiate Components
Then simulation components can be created. An example of a very basic simulation
is to create a data Source and Sink.
In this case the Source is configured to emit the value 0x123 ten times:
use gwr_components::source::Source;
use gwr_components::sink::Sink;
use gwr_components::{connect_port, option_box_repeat};
use gwr_engine::engine::Engine;
fn main() {
let mut engine = Engine::default();
let clock = engine.default_clock();
let source = Source::new_and_register(&engine, engine.top(), "source", option_box_repeat!(0x123 ; 10));
let sink = Sink::new_and_register(&engine, &clock, engine.top(), "sink");
connect_port!(source, tx => sink, rx)
    .expect("should be able to connect `Source` to `Sink`");
}
use gwr_components::source::Source;
use gwr_components::sink::Sink;
use gwr_components::{connect_port, option_box_repeat};
use gwr_engine::engine::Engine;
fn main() {
let mut engine = Engine::default();
let clock = engine.default_clock();
let source = Source::new_and_register(&engine, engine.top(), "source", option_box_repeat!(0x123 ; 10));
let sink = Sink::new_and_register(&engine, &clock, engine.top(), "sink");
connect_port!(source, tx => sink, rx)
    .expect("should be able to connect `Source` to `Sink`");
}
Connect Components
Ports are connected together using the helper connect_port! macro. The
connections are always done in the direction of data flow tx -> rx.
use gwr_components::source::Source;
use gwr_components::sink::Sink;
use gwr_components::{connect_port, option_box_repeat};
use gwr_engine::engine::Engine;
fn main() {
let mut engine = Engine::default();
let clock = engine.default_clock();
let source = Source::new_and_register(&engine, engine.top(), "source", option_box_repeat!(0x123 ; 10));
let sink = Sink::new_and_register(&engine, &clock, engine.top(), "sink");
connect_port!(source, tx => sink, rx)
    .expect("should be able to connect `Source` to `Sink`");
}
Run Simulation
Now that everything has been created and connected the simulation can be run
using the run_simulation! macro:
use gwr_components::source::Source;
use gwr_components::sink::Sink;
use gwr_components::{connect_port, option_box_repeat};
use gwr_engine::engine::Engine;
use gwr_engine::run_simulation;
fn main() {
let mut engine = Engine::default();
let clock = engine.default_clock();
let source = Source::new_and_register(&engine, engine.top(), "source", option_box_repeat!(0x123 ; 10));
let sink = Sink::new_and_register(&engine, &clock, engine.top(), "sink");
connect_port!(source, tx => sink, rx)
    .expect("should be able to connect `Source` to `Sink`");
run_simulation!(engine);
}
The run_simulation! spawns the components specified and then starts then runs
the engine to completion.
Check Results
So, after the simulation has completed it is possible to check that the Sink
has received all the expected data.
use gwr_components::source::Source;
use gwr_components::sink::Sink;
use gwr_components::{connect_port, option_box_repeat};
use gwr_engine::engine::Engine;
use gwr_engine::run_simulation;
fn main() {
let mut engine = Engine::default();
let clock = engine.default_clock();
let source = Source::new_and_register(&engine, engine.top(), "source", option_box_repeat!(0x123 ; 10));
let sink = Sink::new_and_register(&engine, &clock, engine.top(), "sink");
connect_port!(source, tx => sink, rx)
    .expect("should be able to connect `Source` to `Sink`");
run_simulation!(engine);
assert_eq!(sink.num_sunk(), 10);
}
Full Source
The entire example (including the use statements that are required to pull in
the dependencies) looks like this:
use gwr_components::source::Source;
use gwr_components::sink::Sink;
use gwr_components::{connect_port, option_box_repeat};
use gwr_engine::engine::Engine;
use gwr_engine::run_simulation;

fn main() {
    let mut engine = Engine::default();
    let clock = engine.default_clock();
    let source = Source::new_and_register(&engine, engine.top(), "source", option_box_repeat!(0x123 ; 10));
    let sink = Sink::new_and_register(&engine, &clock, engine.top(), "sink");
    connect_port!(source, tx => sink, rx)
        .expect("should be able to connect `Source` to `Sink`");
    run_simulation!(engine);
    assert_eq!(sink.num_sunk(), 10);
}
Examples
Here is a collection of examples written using GWR.
Abstract Examples
Flaky Component
This shows a minimal runnable simulation with custom component behavior.
How to run it:
cargo run --bin flaky-component -- --seed 1 --drop 0.5 --num-packets 1000
Try varying --drop and comparing the number of packets received.
Flaky with Delay
This shows a component using explicit time delays, buffering, and custom functionality.
As with all the examples, you can determine the command-line arguments by
running with --help:
cargo run --bin flaky-with-delay -- --help
Try varying the delay as well as the drop rate.
Scrambler
The scrambler shows how component can have dynamic port connections at runtime depending on command-line arguments.
Compare running:
cargo run --bin scrambler
against
cargo run --bin scrambler -- -s
System Exploration Examples
These examples show GWR being used to build larger systems that you might find in silicon devices.
tip
Most of these larger simulations support --progress to print a
progress bar if you are running them directly (not using gwr-terminus).
Sim Pipe
This simulation shows how you can model a credit-controlled pipeline in order to understand throughput, buffering, latency, and backpressure.
Try running it and varying the data and credit delays and the size of the data buffer which controls the number of credits that can be issued:
cargo run --bin sim-pipe -- --stdout --pipe-data-delay 10 --pipe-buffer-entries 10 --pipe-credit-delay 10
If you now vary the size of the pipe buffer or the delays you will see the impact on pipeline throughput.
Sim Ring
The ring-based interconnect simulation shows how the arbitration can cause such an architecture to deadlock.
The Terminus recipe can be used when you want to sweep ring size, arbitration priority, buffer sizes, or trace settings without rebuilding a long command by hand.
cargo run --bin terminus -- run --recipe examples/sim-ring/recipes/explore_ring_priorities.yaml
You will notice how having a fair priority for ring traffic causes deadlock and it is essential to give priority to traffic in the ring to prevent this.
Sim Fabric
This simulation demonstrates how GWR can be used to build models at different levels of abstraction.
You can use the Terminus recipes to explore the impact of the level of abstraction modelled, which you will see produce quite different performance numbers:
cargo run --bin terminus -- run --recipe examples/sim-fabric/recipes/explore_model.yaml
You can show that with a different traffic pattern the two models do produce very similar results by running the above command again and adding:
--ARGS "--traffic-pattern all-to-one"
There is also a recipe to show how to explore the impact of the fabric data ticks per hop:
cargo run --bin terminus -- run --recipe examples/sim-fabric/recipes/explore_ticks_per_hop.yaml
Beyond Silicon
The sim-restaurant example shows that GWR is not limited to silicon or packet
models. It uses the same engine to explore a restaurant as a system of queues,
workers, time delays, and business outcomes.
Objective
To see how the GWR core can be used to model many types of systems beyond silicon. This example shows how to run a staffing sweep to identify what combination results in the most profitable restaurant.
Run The Simulation
cargo run --bin sim-restaurant -- --min-till-staff 1 --max-till-staff 2 --min-kitchen-staff 1 --max-kitchen-staff 4 --top-results 4
The above command should produce output that looks like:
Restaurant demand plan: 2642 customers from 07:00 to 22:00 (15.0 hours, seed 7).

Till Kitchen  Served   Balked   GaveUp    Revenue      Costs    Profit  Finish h  Max Queue
   1       4    1040     1375      225   13122.40    5251.01   7871.39     15.44   13/24
   2       4    1029     1357      254   13136.50    5495.15   7641.35     15.44   13/24
   1       3     773     1475      391    9880.10    4006.90   5873.20     15.52   12/24
   2       3     781     1452      405    9886.20    4252.65   5633.55     15.55   12/24
Explore Using a TUI
Take a look at which staffing mix maximises profit, where queues build up, and whether the till or kitchen is the real bottleneck. There is a command-line TUI that allows you to inspect the details of what happens during a simulation of a given staffing configuration:
cargo run --bin sim-restaurant-tui -- --till-staff 2 --kitchen-staff 5
Mapping Restaurant Ideas To GWR
This model uses the same building blocks as a silicon simulation:
- Customers are modelled as async tasks that trigger time-based events.
- Till workers and kitchen workers are concurrent async tasks.
- Queues are explicit shared state.
- Service completion is modeled through events.
- Profitability is derived from measurable end-of-run metrics.
Explore The Problem Space
Change one pressure point and rerun:
- Increase
--max-till-staffto see whether the till is the bottleneck. - Increase
--max-kitchen-staffto see whether food preparation is the bottleneck. - Reduce
--join-base-probabilityor raise--join-queue-sensitivityto model less patient customers.
GWR Engine
gwr_engine is a single-threaded asynchronous simulation engine designed to run
models of asynchronous simulation components.
Example
The engine is created as a mutable object engine:
use gwr_engine::engine::Engine;
fn main() {
#[allow(unused_variables, unused_mut)]
let mut engine = Engine::default();
}
Clocks
The engine is responsible for managing the clocks. A user can either get the default clock if they are not concerned about the actual frequency that it runs at:
The engine is created as a mutable object engine:
use gwr_engine::engine::Engine;
fn main() {
let mut engine = Engine::default();
#[allow(unused_variables)]
let clock = engine.default_clock();
}
If a well defined clock frequency is required then the engine provides access the ability to create different clocks:
use gwr_engine::engine::Engine;
fn main() {
let mut engine = Engine::default();
#[allow(unused_variables)]
let clock_1ghz = engine.clock_ghz(1.0);
#[allow(unused_variables)]
let clock_10mhz = engine.clock_mhz(10.0);
}
Spawner
A new asynchronous process is created using the spawner from the engine. For
example, creating a new process can be done with:
use gwr_engine::engine::Engine;
fn main() {
  let mut engine = Engine::default();
  let clock = engine.default_clock();
  let spawner = engine.spawner();
  spawner.spawn(async move {
    for i in 0..10 {
      clock.wait_ticks(1);
      println!("Waiting {i}");
    }
    Ok(())
  });
}
note
The Engine makes no guarantees about the order in which tasks are
evaluated within the same clock tick.
Time-based Simulation
GWR-based simulations can be run as purely event driven (where one event triggers one or more other events) or the use of clocks can be introduced to model time. The combination of both is the most common.
The engine manages the clocks. A simple example of a component that uses the
clock is the rate_limiter which models the amount of time it takes for
objects to pass through it.
Clocks
Clocks are used to control the time within a GWR simulation. The engine
supports any number of clocks running at different frequencies.
Creating a Clock
A clock runs at a frequency and can be created with the either the engine’s
clock_ghz() or clock_mhz() functions.
The following two clocks are equivalent:
use gwr_engine::engine::Engine;
fn main() {
let mut engine = Engine::default();
#[allow(unused_variables)]
let clock_a = engine.clock_ghz(1.0);
#[allow(unused_variables)]
let clock_b = engine.clock_mhz(1000.0);
}
Advancing Time
Time is advanced by waiting an integer number of ticks on a clock. In the
snippet below the println! will be called when the time has advanced to
1.0ns
use gwr_engine::engine::Engine;
fn main() {
let mut engine = Engine::default();
let spawner = engine.spawner();
let clock = engine.clock_ghz(1.0);
spawner.spawn(async move {
clock.wait_ticks(1).await;
println!("Time now {:.2}", clock.time_now_ns());
Ok(())
 });
}
Background Tasks
By default a simulation will run until all events have completed. However, sometimes it is useful to create a monitor task like a progress bar that just needs to run as long as the rest of the simulation.
In order to do this the wait_ticks_or_exit function can be called. This lets
the engine know that it does not have to keep running if this is the only thread
of activity left. For example, the code below will start a thread of activity
that prints the current time in ns periodically as long as the simulation is
running:
use gwr_engine::engine::Engine;
fn main() {
let mut engine = Engine::default();
let spawner = engine.spawner();
let clock = engine.clock_ghz(1.0);
spawner.spawn(async move {
  loop {
    clock.wait_ticks_or_exit(1000).await;
    println!("Time now {:.2}", clock.time_now_ns());
  }
});
}
GWR Track
gwr_track is the logging library used by the GWR engine and all components.
It can be used to generate either text-based or Cap’n Proto-based binary log
files.
Entities
gwr_track provides the Entity struct. It is designed to represent a unique
simulation Entity/component which exists within the simulation hierarchy.
An Entity will have a unique location within the simulation hierarchy and are
each assigned a unique Id. For example:
top::processor0::cpu102::memory
Tracing can be configured globally or enabled/disabled depending on regular expressions matching entity names.
EntitiyMonitor
The EntityMonitor allows the user to create helper structs that can monitor an
Entity and emit useful statistics through track_value() calls.
Objects
For short-lived parts of the simulations (like an Ethernet frame or a memory
access) the user can create a track object. These are given unique Ids like
Entities and Entities so that their lifecycle can be tracked across the
simulation.
IDs
Each Entity will have a unique 64-bit Id. This ID is used throughout the
log/bin files in order to identify the originator of messages and to reduce the
size of the files.
Ids are also assigned to track Objects. Objects do not contain an
Entity because they flow through the simulation and so their location within
the simulation changes. However, the logging of packets is controlled by the
Entity that creates the object.
Macros
The library provides a number of macros that provide the logging functionlity with a minimal run-time overhead when not enabled.
There are the macros that map to log messages of the specified level:
trace!- a message that will only be emitted if log level isTrace.debug!- a message that will only be emitted if log level isDebugor above.info!- a message that will only be emitted if log level isInfoor above.warn!- a message that will only be emitted if log level isWarnor above.error!- a message that will only be emitted if log level isErroror above.
Note: the logging level is controlled globally with the ability to configure
it at the level of any Entity within the simulation hierarchy.
GWR Spotter
gwr-spotter is a utility designed to provide an interactive TUI (Textual User
Interface) for working with log/bin files produced by gwr_track.
It is based on the ratatui library.
Launching
The best way to launch GWR Spotter is using cargo run to ensure that all
dependencies are up to date. For example, in order to launch it and open the
trace.bin file use:
cargo run --release --bin gwr-spotter -- --bin trace.bin
Commands
The most help command to know about is the help as that should contain the
latest up to date command. Use the ? key to open the help and press Esc to
close that view.
Frontend
There is a web-based frontend that can be used to interact with gwr-spotter.
In order to use the frontend you need to run a server on a local port:
cd gwr-spotter/frontend ; python3 -m http.server 9991
and then simply open http://localhost:9991 in a web browser on the same
machine. Whenever gwr-spotter is active you can view the structure of the
model. Any element in the web view that you select will be selected in the TUI.
Views
Note that there are a number of different views of the model that are available within the frontend. The default is a sunburst view which shows the hierarchy. Under the menu on the left there is also a force-tree view that shows how the components are connected.
Resources
Resources are available to model shared resources that have a limited
capacity.
The gwr_resources library provides a collection of shared resource primitives
to be used when building simulations.
Example
An example of this is the flow controlled pipeline where a Resource is used
to model the credit within the pipeline. Credit is acquired with a request()
call and granted with the release() call:
use gwr_engine::engine::Engine;
use gwr_resources::Resource;

fn main() {
  let mut engine = Engine::default();
  let spawner = engine.spawner();
  let clock = engine.clock_ghz(1.0);

  let resource = Resource::new(1);
  // Need a clone for the credit grant process to use.
  let grant = resource.clone();

  // Request credit
  spawner.spawn(async move {
    for i in 0..10 {
        resource.request().await;
        println!("Credit granted {i}");
    }
    Ok(())
  });

  // Release credit
  spawner.spawn(async move {
    for _ in 0..10 {
        clock.wait_ticks(1).await;
        grant.release();
    }
    Ok(())
  });
}
Components
Simulation components are the basic building blocks of any GWR model.
The GWR Engine runs components that are connected together using ports.
The gwr_components library provides a collection of connectable component
primitives to be used when building models.
Creating new components
Components are designed to be composable and connectable simulation blocks. When creating a new one it is important to consider all of the following steps:
- Design the component
- Create a struct
- Add ports
- Create subcomponents
- Implement any custom functionality
- Provide default implementations for other methods
This documentation will take you through designing a custom component that will be used to drop a random number of objects that pass through it.
Design the Component
There are a number of things to consider when designing a new simulation component. The two main aspects are
Component Interfaces
An interface will comprise one or more ports and define how a component connects to and interacts with other components.
So it is first essential to define the types of interfaces a component will have and how many of each there will be. Then, the required ports can be created.
A port has a flow of data. The general naming convention is:
- Where data flows in to a component it is a receive port (
rx). - Where data flows out of a component it is a transmit port (
tx).
Component Functionality
Some components are simply collections of other components plugged together. In
most cases, however, it will be necessary to define custom functionality for the
port. This includes how the ports handle data they send/receive as well as
general activity that can be spawned in the run() function.
Create a Struct
The first thing to define when creating a component is to create the structs
that define the component.
All components should contain an Entity which is used to configure the logging
and also to give a unique location within the model hierarchy. The Entity will
be wrapped in std::rc::Rc so that it can be shared.
use std::marker::PhantomData;
use std::rc::Rc;
use gwr_engine::traits::SimObject;
use gwr_model_builder::{EntityGet, EntityDisplay};
use gwr_track::entity::Entity;
#[allow(dead_code)]

#[derive(EntityGet, EntityDisplay)]
struct MyComponent<T>
where
    T: SimObject
{
    entity: Rc<Entity>,

    // Any component-specific state
  phantom: PhantomData<T>
}
fn main() {}
Ports
A component will have a number of ports which provide its interfaces to other components.
Output / Input
Ports can either be “output” or “input”. A connection must always be made between one output and one input port.
Data Types
The type of the port is specialised by the data type that it carries. Ports have to be of the same type to be connected together.
Component Ports
Components provide functions that allow the connection of their ports. Ports can either be connected directly to a component or to a subcomponent. It is therefore up to the component writer to provide the relevant functions and connect the ports as required.
Port connection functions take two forms - those that take arrays indices and those that don’t. Each function will have a unique name depending on the port name and the direction of data flow. Some examples are provided below.
The Flaky component also provides a example of a custom component.
Input Ports
The function naming is critical. The method for an input port will return a shared reference to a shared state that is then passed to the output to complete the connection.
Here are a few examples:
A component with a single input port called rx will have:
use std::marker::PhantomData;
use gwr_engine::port::PortStateResult;
use gwr_engine::traits::SimObject;
#[allow(dead_code)]
struct TestBlock<T> { phantom: PhantomData<T> }
impl<T: SimObject> TestBlock<T> {
#[allow(dead_code)]
pub fn port_rx(&self) -> PortStateResult<T>
{ todo!() }
}
fn main() {}
A component with an array of input ports called in will have:
use std::marker::PhantomData;
use gwr_engine::port::PortStateResult;
use gwr_engine::traits::SimObject;
#[allow(dead_code)]
struct TestBlock<T> { phantom: PhantomData<T> }
impl<T: SimObject> TestBlock<T> {
#[allow(dead_code, unused_variables)]
pub fn port_in_i(&self, i: usize) -> PortStateResult<T>
{ todo!() }
}
fn main() {}
Output Ports
Output ports are connected by passing in the shared state that both sides of the
interface use. If the port is already connected then a panic! will be raised.
A component with a single output port called tx will have:
use std::marker::PhantomData;
use gwr_engine::port::PortStateResult;
use gwr_engine::traits::SimObject;
use gwr_engine::types::SimResult;
#[allow(dead_code)]
struct TestBlock<T> { phantom: PhantomData<T> }
impl<T: SimObject> TestBlock<T> {
#[allow(dead_code, unused_variables)]
pub fn connect_port_tx(&self, port_state: PortStateResult<T>) -> SimResult
{ todo!() }
}
fn main() {}
A component with an array of output ports called out will have:
use std::marker::PhantomData;
use gwr_engine::port::PortStateResult;
use gwr_engine::traits::SimObject;
use gwr_engine::types::SimResult;
#[allow(dead_code)]
struct TestBlock<T> { phantom: PhantomData<T> }
impl<T: SimObject> TestBlock<T> {
#[allow(dead_code, unused_variables)]
pub fn connect_port_out_i(&self, i: usize, port_state: PortStateResult<T>) -> SimResult
{ todo!() }
}
fn main() {}
Connecting Ports
Connections are always made in the direction of flow of data (tx -> rx). For
example:
use gwr_components::sink::Sink;
use gwr_components::source::Source;
use gwr_components::{connect_port, option_box_repeat};
use gwr_engine::engine::Engine;
fn main() {
let num_puts = 10;
let mut engine = Engine::default();
let clock = engine.default_clock();
let mut source = Source::new_and_register(&engine, engine.top(), "source", option_box_repeat!(0x123 ; num_puts));
let sink = Sink::new_and_register(&engine, &clock, engine.top(), "sink");
connect_port!(source, tx => sink, rx)
    .expect("should be able to connect `Source` to `Sink`");
}
Errors
If attempting to connect ports that don’t exist on the source/dest components then there will be a compile error.
use gwr_components::sink::Sink;
use gwr_components::source::Source;
use gwr_components::{connect_port, option_box_repeat};
use gwr_engine::engine::Engine;
fn main() {
let num_puts = 10;
let mut engine = Engine::default();
let clock = engine.default_clock();
let mut source = Source::new_and_register(&engine, engine.top(), "source", option_box_repeat!(0x123 ; num_puts));
let sink = Sink::new_and_register(&engine, &clock, engine.top(), "sink");
connect_port!(source, tx => sink, invalid)
    .expect("should be able to connect `Source` to `Sink`");
}
Create Subcomponents
A component is the building block of models. It will have ports and usually comprise subcomponents and some extra logic.
The examples/flaky-with-delay gives an example of a simple component that uses an existing subcomponent.
Implement Custom Functionality
Each component must implement the Runnable trait which allows it to be
registered with the Engine to ensure that it is run when the simulation
starts.
The async run(&self) method is defined by all components that provide custom
functionality.
Currently this relies on the #[async_trait(?Send)] support for async traits.
The (?Send) decoration indicating that only single-threaded support is
required.
use async_trait::async_trait;
use std::marker::PhantomData;
use gwr_engine::traits::{Runnable, SimObject};
use gwr_engine::types::SimResult;

struct MyComponent<T>
where
   T: SimObject
{
   phantom: PhantomData<T>
}
#[async_trait(?Send)]
impl<T> Runnable for MyComponent<T> where T: SimObject {
    async fn run(&self) -> SimResult {
        // Implement custom-functionality

        // Return result - Ok unless there is an error to raise
        Ok(())
    }
}
fn main() {}
The examples/flaky-with-delay gives an example of a component that uses
custom run() functionality.
Default Functionality
If the new component does not need to have any custom behaviour and is simply
connecting a collection of sub-components then it can implement just use the
default Runnable provided by the library with a derive statement.
use async_trait::async_trait;
use std::marker::PhantomData;
use gwr_engine::traits::SimObject;
use gwr_model_builder::Runnable;
use gwr_engine::types::SimResult;

#[derive(Runnable)]
struct MyComponent<T>
where
   T: SimObject
{
    // Component members
   phantom: PhantomData<T>
}
fn main() {}
Testing
Components can be tested by connecting them into a small simulation and driving
their ports directly. For simple cases this can be done by hand with
OutPort/InPort, but most component tests need the same testbench structure:
- Create an engine and the device under test (DUT).
- Connect driver ports to DUT input ports.
- Connect receiver ports to DUT output ports.
- Run a sequence of sends, expects, delays, and no-traffic checks.
The build_component_harness! macro will generate the repeated testbench code.
It generates the harness struct, Port/Step enums, helper macros, etc.
Harnesses are usually declared inside a small test module. This keeps generated
names such as Port, Step, and the helper macros local to the harness and
avoids clashes with other harnesses in the same test file.
For example, the harness around a Delay component is created and used below:
#![allow(unused)]
fn main() {
mod delay_harness {
    use std::rc::Rc;

    use gwr_components::build_component_harness;
    use gwr_components::delay::Delay;
    use gwr_engine::test_helpers::start_test;

    build_component_harness! {
        harness DelayHarness<T> {
            component: delay: Rc<Delay<T>>,
            rx ports: {
                Rx<T> => rx,
            },
            tx ports: {
                Tx<T> => tx,
            },
        }
    }

    #[test]
    fn delay_forwards_values() {
        let mut engine = start_test(file!());
        let clock = engine.default_clock();
        let delay = Delay::new_and_register(&engine, &clock, engine.top(), "delay", 5).unwrap();
        let mut harness = DelayHarness::new(engine, delay);

        harness.run_steps([
            send_rx!(10),
            expect_no_traffic!(&[Port::Tx], 4),
            expect_tx!(10),
        ]);
    }
}
}
The macro supports scalar RX/TX ports and RX/TX port arrays. Each port section
is optional, so a source-only component can define only tx ports and a
sink-only component can define only rx ports.
Step can be a send, expect, delay, no-traffic check, Seq(Vec<Step<...>>)
that runs child steps in order, or Par(Vec<Step<...>>) that runs child steps
concurrently and waits for all of them before moving on. The generated seq!
and par! helper macros build those recursive control structures and record
their source location, so tests can express parallel sequences on different
ports while keeping error messages tied to the call site.
The harness checks that each step is used on a compatible port; for example, using an expect step on an RX port or a send step on a TX port will fail the test.
Use run_steps([Step<...>]) for fixed test sequences and
run_step_generator(iterator) for stateful generators that yield steps as the
test progresses.
The gwr_components Library
This page details the basic components that the gwr_components library
provides.
Data Sources and Sinks
Source
The Source component will drive objects into any other component. It is
configured with a generator to produce the objects.
Interfaces: tx: output port.
Sink
The Sink component will pull objects from another component. It keeps track of
the number of sunk objects for basic checking.
Interfaces: rx: input port.
Data Store
The Store is a basic component that can store a specified number of objects.
Interfaces: rx: input port, tx: output port.
Delay
The Delay component adds a defined delay (in Clock ticks) from the time an
object enters it until it is then sent on.
Interfaces: rx: input port, tx: output port.
Rate Limiters
The Limiter component models how long it takes for objects to travel through
them and ensure their bandwidth limits are respected.
Interfaces: rx: input port, tx: output port.
Routers
A Router takes objects from its input and sends them to one of its i outputs
depending on the dest() it provides.
Interfaces: rx: input port, tx(i): output ports.
Arbiters
An Arbiter takes objects from one of its i inputs and sends them to its
output. The Arbiter is created with a defined policy as to how to choose
between its inputs if more than one of them is ready.
Interfaces: rx(i): input ports, tx: output port.
Arbiteration Policies
An Arbiter needs to be created with an arbitration policy in order to make the
arbitration decisions. A number of arbitration policies are provided in the
library or the user can write their own custom policy. The existing policies
are:
Round RobinWeighted Round RobinPriority Round Robin
Examples
This example shows the source required to implement a custom component. This example talks through create a component that will drop a specified rate of packets.
Use Statements
The first thing to do is use all the libraries that are required.
// Copyright (c) 2023 Graphcore Ltd. All rights reserved.

//! This is an example component that will randomly drop data being passed
//! through it.
//!
//! The `main.rs` in this folder shows how it can be used.
//!
//! # Ports
//!
//! This component has two ports
//!  - One [input port](gwr_engine::port::InPort): `rx`
//!  - One [output put port](gwr_engine::port::OutPort): `tx`


/// The `RefCell` allows the engine to be able to access state immutably as
/// well as mutably.
use std::cell::RefCell;
/// The `Rc` part of the standard library brings in types used for thread
/// synchronisation.
use std::rc::Rc;

use async_trait::async_trait;
use gwr_components::{connect_tx, port_rx, take_option};
use gwr_engine::engine::Engine;
use gwr_engine::port::{InPort, OutPort, PortStateResult};
use gwr_engine::time::clock::Clock;
use gwr_engine::traits::{Runnable, SimObject};
use gwr_engine::types::SimResult;
use gwr_model_builder::{EntityDisplay, EntityGet};
/// The gwr_track library provides tracing/logging features.
use gwr_track::entity::Entity;
use gwr_track::trace;
/// Random library is just used by this component to implement its drop
/// decisions.
use rand::rngs::StdRng;
use rand::{RngCore, SeedableRng};


/// The overall structure for this compoment.
///
/// Note that in this example it is a *Generic* type in that it can be used in
/// a simulation of any type - as long as that type implements the `SimObject`
/// trait.
///
/// Every entity needs to implement the `GetEntity` trait in order to provide
/// the `entity()` access function to get at the private `entity` member. The
/// `EntityGet` automatically implements this function for this struct.
///
/// The `fmt::Display` trait is used when converting a component to a string
/// for logging/printing using "{}". Simply pass through to the entity. This can
/// be hand-written, but the `EntityDisplay` derive writes this automatically.
#[derive(EntityGet, EntityDisplay)]
pub struct Flaky<T>
where
    T: SimObject,
{
    /// Every component should include an Entity that defines where in the
    /// overall simulation hierarchy it is. The Entity is also used to
    /// filter logging.
    entity: Rc<Entity>,

    /// Store the ratio at which packets should be dropped.
    drop_ratio: f64,

    /// Random number generator used for deciding when to drop. Note that it is
    /// wrapped in a [RefCell] which allows it to be used mutably in the `put()`
    /// function despite the fact that the struct will be immutable.
    rng: RefCell<StdRng>,

    /// Rx port to which to send any data that hasn't been dropped.
    /// Again, needs to be wrapped in the [RefCell] to allow it to be changed
    /// when components are actually connected.
    ///
    /// Note: It is also wrapped in an [Option] so that it can be taken out in
    /// the `run()` function.
    rx: RefCell<Option<InPort<T>>>,

    /// Tx port to which to send any data that hasn't been dropped.
    ///
    /// Note: It is also wrapped in an [Option] so that it can be taken out in
    /// the `run()` function.
    tx: RefCell<Option<OutPort<T>>>,
}


/// The next thing to do is define the generic functions for the new component.
impl<T> Flaky<T>
where
    T: SimObject,
{
    /// In this case, the `new()` function creates the component from the
    /// parameters provided.
    pub fn new_and_register(
        engine: &Engine,
        clock: &Clock,
        parent: &Rc<Entity>,
        name: &str,
        drop_ratio: f64,
        seed: u64,
    ) -> Rc<Self> {
        // The entity needs to be created first because it is shared between the state
        // and the component itself.
        let entity = Entity::new(parent, name);

        // Because it is shared it needs to be wrapped in an Rc
        let entity = Rc::new(entity);

        let rx = InPort::new(engine, clock, &entity, "rx");
        let tx = OutPort::new(&entity, "tx");
        // Finally, the top-level struct is created and wrapped in an Rc.
        let rc_self = Rc::new(Self {
            entity,
            drop_ratio,
            rng: RefCell::new(StdRng::seed_from_u64(seed)),
            rx: RefCell::new(Some(rx)),
            tx: RefCell::new(Some(tx)),
        });
        engine.register(rc_self.clone());
        rc_self
    }

    /// This provides the `InPort` to which you can connect
    pub fn port_rx(&self) -> PortStateResult<T> {
        // The `port_rx!` macro is the most consise way to access the rx port state
        // when wrapped in `RefCell<Option<>>`.
        port_rx!(self.rx, state)
    }

    /// The ports of this component are effectively defined by the functions
    /// this component exposes. In this case, the `connect_port_tx` shows
    /// that this component has an TX port which should be connected to an RX
    /// port.
    pub fn connect_port_tx(&self, port_state: PortStateResult<T>) -> SimResult {
        // Because the State is immutable then we use the `connect_tx!` macro
        // in order to simplify the setup when wrapped in `RefCell<Option<>>`.
        connect_tx!(self.tx, connect ; port_state)
    }

    /// Return the next random u32
    ///
    /// This is wrapped in a separate function to hide the interior mutation
    fn next_u32(&self) -> u32 {
        self.rng.borrow_mut().next_u32()
    }
}

#[async_trait(?Send)]
impl<T> Runnable for Flaky<T>
where
    T: SimObject,
{
    async fn run(&self) -> SimResult {
        let mut rx = take_option!(self.rx);
        let mut tx = take_option!(self.tx);

        loop {
            // Receive a value from the input
            let value = rx.get()?.await;

            let next_u32 = self.next_u32();
            let ratio = next_u32 as f64 / u32::MAX as f64;
            if ratio > self.drop_ratio {
                // Only pass on a percentage of the data
                tx.put(value)?.await;
            } else {
                // Let the user know this value has been dropped.
                trace!(self.entity ; "drop {}", value);
            }
        }
    }
}
Struct
Next, a struct representing the state of the component needs to be defined.
// Copyright (c) 2023 Graphcore Ltd. All rights reserved.

//! This is an example component that will randomly drop data being passed
//! through it.
//!
//! The `main.rs` in this folder shows how it can be used.
//!
//! # Ports
//!
//! This component has two ports
//!  - One [input port](gwr_engine::port::InPort): `rx`
//!  - One [output put port](gwr_engine::port::OutPort): `tx`


/// The `RefCell` allows the engine to be able to access state immutably as
/// well as mutably.
use std::cell::RefCell;
/// The `Rc` part of the standard library brings in types used for thread
/// synchronisation.
use std::rc::Rc;

use async_trait::async_trait;
use gwr_components::{connect_tx, port_rx, take_option};
use gwr_engine::engine::Engine;
use gwr_engine::port::{InPort, OutPort, PortStateResult};
use gwr_engine::time::clock::Clock;
use gwr_engine::traits::{Runnable, SimObject};
use gwr_engine::types::SimResult;
use gwr_model_builder::{EntityDisplay, EntityGet};
/// The gwr_track library provides tracing/logging features.
use gwr_track::entity::Entity;
use gwr_track::trace;
/// Random library is just used by this component to implement its drop
/// decisions.
use rand::rngs::StdRng;
use rand::{RngCore, SeedableRng};


/// The overall structure for this compoment.
///
/// Note that in this example it is a *Generic* type in that it can be used in
/// a simulation of any type - as long as that type implements the `SimObject`
/// trait.
///
/// Every entity needs to implement the `GetEntity` trait in order to provide
/// the `entity()` access function to get at the private `entity` member. The
/// `EntityGet` automatically implements this function for this struct.
///
/// The `fmt::Display` trait is used when converting a component to a string
/// for logging/printing using "{}". Simply pass through to the entity. This can
/// be hand-written, but the `EntityDisplay` derive writes this automatically.
#[derive(EntityGet, EntityDisplay)]
pub struct Flaky<T>
where
    T: SimObject,
{
    /// Every component should include an Entity that defines where in the
    /// overall simulation hierarchy it is. The Entity is also used to
    /// filter logging.
    entity: Rc<Entity>,

    /// Store the ratio at which packets should be dropped.
    drop_ratio: f64,

    /// Random number generator used for deciding when to drop. Note that it is
    /// wrapped in a [RefCell] which allows it to be used mutably in the `put()`
    /// function despite the fact that the struct will be immutable.
    rng: RefCell<StdRng>,

    /// Rx port to which to send any data that hasn't been dropped.
    /// Again, needs to be wrapped in the [RefCell] to allow it to be changed
    /// when components are actually connected.
    ///
    /// Note: It is also wrapped in an [Option] so that it can be taken out in
    /// the `run()` function.
    rx: RefCell<Option<InPort<T>>>,

    /// Tx port to which to send any data that hasn't been dropped.
    ///
    /// Note: It is also wrapped in an [Option] so that it can be taken out in
    /// the `run()` function.
    tx: RefCell<Option<OutPort<T>>>,
}


/// The next thing to do is define the generic functions for the new component.
impl<T> Flaky<T>
where
    T: SimObject,
{
    /// In this case, the `new()` function creates the component from the
    /// parameters provided.
    pub fn new_and_register(
        engine: &Engine,
        clock: &Clock,
        parent: &Rc<Entity>,
        name: &str,
        drop_ratio: f64,
        seed: u64,
    ) -> Rc<Self> {
        // The entity needs to be created first because it is shared between the state
        // and the component itself.
        let entity = Entity::new(parent, name);

        // Because it is shared it needs to be wrapped in an Rc
        let entity = Rc::new(entity);

        let rx = InPort::new(engine, clock, &entity, "rx");
        let tx = OutPort::new(&entity, "tx");
        // Finally, the top-level struct is created and wrapped in an Rc.
        let rc_self = Rc::new(Self {
            entity,
            drop_ratio,
            rng: RefCell::new(StdRng::seed_from_u64(seed)),
            rx: RefCell::new(Some(rx)),
            tx: RefCell::new(Some(tx)),
        });
        engine.register(rc_self.clone());
        rc_self
    }

    /// This provides the `InPort` to which you can connect
    pub fn port_rx(&self) -> PortStateResult<T> {
        // The `port_rx!` macro is the most consise way to access the rx port state
        // when wrapped in `RefCell<Option<>>`.
        port_rx!(self.rx, state)
    }

    /// The ports of this component are effectively defined by the functions
    /// this component exposes. In this case, the `connect_port_tx` shows
    /// that this component has an TX port which should be connected to an RX
    /// port.
    pub fn connect_port_tx(&self, port_state: PortStateResult<T>) -> SimResult {
        // Because the State is immutable then we use the `connect_tx!` macro
        // in order to simplify the setup when wrapped in `RefCell<Option<>>`.
        connect_tx!(self.tx, connect ; port_state)
    }

    /// Return the next random u32
    ///
    /// This is wrapped in a separate function to hide the interior mutation
    fn next_u32(&self) -> u32 {
        self.rng.borrow_mut().next_u32()
    }
}

#[async_trait(?Send)]
impl<T> Runnable for Flaky<T>
where
    T: SimObject,
{
    async fn run(&self) -> SimResult {
        let mut rx = take_option!(self.rx);
        let mut tx = take_option!(self.tx);

        loop {
            // Receive a value from the input
            let value = rx.get()?.await;

            let next_u32 = self.next_u32();
            let ratio = next_u32 as f64 / u32::MAX as f64;
            if ratio > self.drop_ratio {
                // Only pass on a percentage of the data
                tx.put(value)?.await;
            } else {
                // Let the user know this value has been dropped.
                trace!(self.entity ; "drop {}", value);
            }
        }
    }
}
Component Implementation
The component itself needs to implement a number of functions, including the
constructor (new()) and functions that allow it to be connected
(connect_port_tx() / port_rx()):
// Copyright (c) 2023 Graphcore Ltd. All rights reserved.

//! This is an example component that will randomly drop data being passed
//! through it.
//!
//! The `main.rs` in this folder shows how it can be used.
//!
//! # Ports
//!
//! This component has two ports
//!  - One [input port](gwr_engine::port::InPort): `rx`
//!  - One [output put port](gwr_engine::port::OutPort): `tx`


/// The `RefCell` allows the engine to be able to access state immutably as
/// well as mutably.
use std::cell::RefCell;
/// The `Rc` part of the standard library brings in types used for thread
/// synchronisation.
use std::rc::Rc;

use async_trait::async_trait;
use gwr_components::{connect_tx, port_rx, take_option};
use gwr_engine::engine::Engine;
use gwr_engine::port::{InPort, OutPort, PortStateResult};
use gwr_engine::time::clock::Clock;
use gwr_engine::traits::{Runnable, SimObject};
use gwr_engine::types::SimResult;
use gwr_model_builder::{EntityDisplay, EntityGet};
/// The gwr_track library provides tracing/logging features.
use gwr_track::entity::Entity;
use gwr_track::trace;
/// Random library is just used by this component to implement its drop
/// decisions.
use rand::rngs::StdRng;
use rand::{RngCore, SeedableRng};


/// The overall structure for this compoment.
///
/// Note that in this example it is a *Generic* type in that it can be used in
/// a simulation of any type - as long as that type implements the `SimObject`
/// trait.
///
/// Every entity needs to implement the `GetEntity` trait in order to provide
/// the `entity()` access function to get at the private `entity` member. The
/// `EntityGet` automatically implements this function for this struct.
///
/// The `fmt::Display` trait is used when converting a component to a string
/// for logging/printing using "{}". Simply pass through to the entity. This can
/// be hand-written, but the `EntityDisplay` derive writes this automatically.
#[derive(EntityGet, EntityDisplay)]
pub struct Flaky<T>
where
    T: SimObject,
{
    /// Every component should include an Entity that defines where in the
    /// overall simulation hierarchy it is. The Entity is also used to
    /// filter logging.
    entity: Rc<Entity>,

    /// Store the ratio at which packets should be dropped.
    drop_ratio: f64,

    /// Random number generator used for deciding when to drop. Note that it is
    /// wrapped in a [RefCell] which allows it to be used mutably in the `put()`
    /// function despite the fact that the struct will be immutable.
    rng: RefCell<StdRng>,

    /// Rx port to which to send any data that hasn't been dropped.
    /// Again, needs to be wrapped in the [RefCell] to allow it to be changed
    /// when components are actually connected.
    ///
    /// Note: It is also wrapped in an [Option] so that it can be taken out in
    /// the `run()` function.
    rx: RefCell<Option<InPort<T>>>,

    /// Tx port to which to send any data that hasn't been dropped.
    ///
    /// Note: It is also wrapped in an [Option] so that it can be taken out in
    /// the `run()` function.
    tx: RefCell<Option<OutPort<T>>>,
}


/// The next thing to do is define the generic functions for the new component.
impl<T> Flaky<T>
where
    T: SimObject,
{
    /// In this case, the `new()` function creates the component from the
    /// parameters provided.
    pub fn new_and_register(
        engine: &Engine,
        clock: &Clock,
        parent: &Rc<Entity>,
        name: &str,
        drop_ratio: f64,
        seed: u64,
    ) -> Rc<Self> {
        // The entity needs to be created first because it is shared between the state
        // and the component itself.
        let entity = Entity::new(parent, name);

        // Because it is shared it needs to be wrapped in an Rc
        let entity = Rc::new(entity);

        let rx = InPort::new(engine, clock, &entity, "rx");
        let tx = OutPort::new(&entity, "tx");
        // Finally, the top-level struct is created and wrapped in an Rc.
        let rc_self = Rc::new(Self {
            entity,
            drop_ratio,
            rng: RefCell::new(StdRng::seed_from_u64(seed)),
            rx: RefCell::new(Some(rx)),
            tx: RefCell::new(Some(tx)),
        });
        engine.register(rc_self.clone());
        rc_self
    }

    /// This provides the `InPort` to which you can connect
    pub fn port_rx(&self) -> PortStateResult<T> {
        // The `port_rx!` macro is the most consise way to access the rx port state
        // when wrapped in `RefCell<Option<>>`.
        port_rx!(self.rx, state)
    }

    /// The ports of this component are effectively defined by the functions
    /// this component exposes. In this case, the `connect_port_tx` shows
    /// that this component has an TX port which should be connected to an RX
    /// port.
    pub fn connect_port_tx(&self, port_state: PortStateResult<T>) -> SimResult {
        // Because the State is immutable then we use the `connect_tx!` macro
        // in order to simplify the setup when wrapped in `RefCell<Option<>>`.
        connect_tx!(self.tx, connect ; port_state)
    }

    /// Return the next random u32
    ///
    /// This is wrapped in a separate function to hide the interior mutation
    fn next_u32(&self) -> u32 {
        self.rng.borrow_mut().next_u32()
    }
}

#[async_trait(?Send)]
impl<T> Runnable for Flaky<T>
where
    T: SimObject,
{
    async fn run(&self) -> SimResult {
        let mut rx = take_option!(self.rx);
        let mut tx = take_option!(self.tx);

        loop {
            // Receive a value from the input
            let value = rx.get()?.await;

            let next_u32 = self.next_u32();
            let ratio = next_u32 as f64 / u32::MAX as f64;
            if ratio > self.drop_ratio {
                // Only pass on a percentage of the data
                tx.put(value)?.await;
            } else {
                // Let the user know this value has been dropped.
                trace!(self.entity ; "drop {}", value);
            }
        }
    }
}
Protocols
Protocols represent packet/frame types.
The gwr_protocol library aims to eventually provide a collection of packet
based protocols to be used when building simulations.
gwr_protocol also provides the build_packet_type macro.
Models
Models are the constructed from components and resources and run by the
gwr_engine.
The gwr_models library provides a collection of connectable models to be used
when building larger models and simulations. The following is a brief and not
exhaustive list of the models provided.
Frames
Many systems are based on frames (packets) of different forms.
Memory Access
Memory traffic is represented with MemoryAccess, which carries routing, access
type, payload size, and protocol overhead.
Ethernet Frame
The EthernetFrame represents a frame that looks like the one defined in the
standards.
Flow Controlled Pipeline
A flow controlled pipeline represents a low-level hardware component which can be used to moved data in a system. It comprises a buffer that will hold data received from the sender and a credit-based mechanism for ensuring the buffer doesn’t overflow.
Interfaces: rx: input port, tx: output port
Ethernet Link
The EthernetLink is effectively a bi-directional set of connections that have
similar properties to a connection over an Ethernet link.
Interfaces: rx_a, rx_b : input ports, tx_a, tx_b: output ports
Memory
A model of a memory to handle read/write accesses.
Interfaces: rx: input port, tx: output port
Cache
A basic model of a n-way set associative cache.
Interfaces:
dev_rx: device-side input portdev_tx: device-side output portmem_rx: memory-side input portmem_tx: memory-side output port
Ring Node
A model of a node that can sit in a ring communication topology.
Interfaces:
ring_rx: input port for data travelling in ringring_tx: output port for data travelling in ringio_rx: input port for data entering the ringio_tx: output port for data leaving the ring
Fabric
A model of a two-dimensional interconnect fabric. It is provided in both functional and routed implementations that provide the same interfaces but trade off model accuracy vs run-time performance.
**Interfaces:**gwr-
rx(i): input port for data ingress into the fabrictx(i): output port for data egress from the fabric
Testing
Models can be tested using the build_model_harness! macro. This wraps a model
with a simple test harness that drives and expects objects that implement the
AccessMemory trait. The model harness uses the same harness DSL and generated
API as build_component_harness!, but uses MemoryTxn to check objects coming
out of the model.
MemoryTxn lets tests match only the memory access fields that matter for a
scenario. For example, this test harness checks that a Memory model produces a
read response for the expected destination address, while ignoring fields that
are not specified:
#![allow(unused)]
fn main() {
mod memory_harness {
    use std::rc::Rc;

    use gwr_engine::test_helpers::start_test;
    use gwr_models::build_model_harness;
    use gwr_models::memory::memory_access::MemoryAccess;
    use gwr_models::memory::{Memory, MemoryConfig};
    use gwr_models::test_helpers::{MemoryTxn, create_default_memory_map, create_read};

    const DST_ADDR: u64 = 0x80000;
    const SRC_ADDR: u64 = 0x90000;
    const ACCESS_SIZE_BYTES: usize = 64;
    const OVERHEAD_SIZE_BYTES: usize = 8;

    build_model_harness! {
        harness MemoryHarness<T> {
            component: memory: Rc<Memory<T>>,
            rx ports: {
                Rx<T> => rx,
            },
            tx ports: {
                Tx<T> => tx,
            },
        }
    }

    #[test]
    fn model_harness_matches_selected_memory_fields() {
        let mut engine = start_test(file!());
        let clock = engine.default_clock();
        let config = MemoryConfig::new(DST_ADDR, 0x40000, 32, 1);
        let memory = Memory::<MemoryAccess>::new_and_register(
            &engine,
            &clock,
            engine.top(),
            "memory",
            config,
        )
        .unwrap();
        let memory_map = Rc::new(create_default_memory_map());
        let request = create_read(
            engine.top(),
            &memory_map,
            ACCESS_SIZE_BYTES,
            DST_ADDR,
            SRC_ADDR,
            OVERHEAD_SIZE_BYTES,
        );
        let mut harness = MemoryHarness::new(engine, memory);

        harness.run_steps([
            send_rx!(request),
            expect_tx!(MemoryTxn::read_rsp(DST_ADDR)),
        ]);
    }
}
}
Use the component harness documentation for the shared syntax and execution model.
GWR Platform
gwr_platform is the library used to define and build execution platforms from
configuration files.
A platform in GWR is the structural description of the machine that a workload runs on. It brings together named processing elements, memories, caches, fabrics, and the connections between them into one validated object.
What It Provides
The gwr_platform library provides:
- YAML configuration file support.
- build functions that construct memories, processing elements, caches, and
fabrics via the
gwr_platform::buildermodule. - connection functions that wire a platform together via the
gwr_platform::connectmodule.
A Simple Platform
An example of a simple platform could include:
- a processing element
- an L1 cache
- a backing memory
- a memory map describing what memory the PE can address
For example:
use gwr_engine::engine::Engine;
use gwr_platform::Platform;
fn main() {
let mut engine = Engine::default();
let clock = engine.default_clock();
let _ = Platform::from_string(&engine, &clock, "
memory_maps:
  - name: pe_memory_map
    devices:
      - name: mem0

processing_elements:
  - name: pe0
    memory_map: pe_memory_map
    config:
      lsu_access_bytes: 32
      sram_bytes: 64KiB

caches:
  - name: l1_0
    config:
      bw_bytes_per_cycle: 32
      line_size_bytes: 32
      delay_ticks: 4

memories:
  - name: mem0
    kind: ddr
    base_address: 0x1_0000_0000
    capacity_bytes: 1GiB
    delay_ticks: 40

connections:
  - connect:
      - pe.pe0
      - cache.l1_0.dev
  - connect:
      - cache.l1_0.mem
      - mem.mem0
").unwrap_or_else(|err| panic!("failed to validate: {err}"));
}
Example
Load a platform from YAML and inspect the resulting structure:
use std::path::Path;
use std::rc::Rc;

use gwr_engine::engine::Engine;
use gwr_platform::Platform;

fn main() -> Result<(), Box<dyn std::error::Error>> {
    let mut engine = Engine::default();
    let clock = engine.default_clock();

    let platform = Rc::new(Platform::from_file(
        &engine,
        &clock,
        Path::new("gwr-platform/examples/simple_pe_cache_mem.yaml"),
    )?);

    println!("Platform has {} processing elements", platform.num_pes());
    println!("{platform}");
    Ok(())
}
Documentation
This chapter describes how the GWR engine and accompanying libraries are documented.
Developer Guide
The developer guide is an mdbook. In order to produce the document it is
necessary to first install the development dependencies by running:
./.github/actions/install-dev-dependencies/install.sh
and then build and open the user guide with:
cd gwr-developer-guide/
mdbook build --open
If developing the guide then this command will launch a process that continually monitors the source and regenerates the HTML if it changes (causing the browser to automatically refresh):
mdbook serve --open
This user guide is written using mdbook. However, because these packages are
not released via crates.io the usual Rust playground integration is disabled.
As use of the mdbook test command does not lend itself well to testing crates
directly from a local workspace all Rust source within the developer guide is
instead tested using the mdBook-Keeper plugin. This plugin tests all included
code snippets during the mdBook build process.
A “wrapper” test within the Rust source of the gwr_developer_guide library is
used to ensure that the mdBook build process is tested whenever cargo test
is run at the workspace level.
API Documentation
Documentation within the GWR source is done using rustdoc formatting such
that APIs are documented and any code snippets are compiled and run.
This documentation can be generated by running:
cargo doc-gwr --open
The documentation can also be generated to include private items, which can be useful when developing GWR packages, by running:
cargo doc-gwr-dev --open
Building this developer guide also generates the API documentation.
API Documentation
Please note the rustdoc output cannot be reached when this page is accessed
via mdbook serve. Should you wish to view the API documentation run
mdbook build or mdbook watch instead.
The documentation will then be displayed in the above frame, as well as being accessible externally to this developer guide.
Contributing
In order to contribute to GWR you will need to install some tooling and set up a workspace.
Setup
Cloning the GWR repo
Some packages within the GWR workspace, such as the -sys packages, use git
submodules to make source code from other repositories avaliable. When cloning
this repo passing the --recurse-submodules option is sufficient to make
everything required avaliable. The --shallow-submodules can also be passed.
Tooling
All of the required tooling to build and use, and to develop GWR can be installed using the scripts included within the repo. These scripts are designed to be used by both users and the CI system.
Dependencies will be installed using package managers where possible, with APT being used on Linux and Homebrew on macOS (Homebrew itself will be installed as required if not already avaliable). Various cross-platform package managers are also used, including rustup, Cargo, and npm.
See the Using GWR Packages and Developing GWR Packages sections for further details on these install scripts.
Rust Tools
The correct Rust toolchain will automatically be selected and used by rustup
when commands are executed from within the GWR directory (or below). This
behaviour is controlled by the the rust-toolchain.toml file.
Using GWR Packages
For users of the GWR packages a stable Rust toolchain is required, as well as
external tools such as Asciidoctor, Cap’n Proto, and mdBook. All of the
required build dependencies can be installed by running:
./.github/actions/install-build-dependencies/install.sh
important
To ensure that the correct Rust toolchain is used the script must be executed from within the GWR directory.
tip
Although the script is interactive, selecting the default option (Enter) at every step is a reasonable choice and will result in a working environment.
note
Some of the actions taken by the script may request elevated permissions via
sudo.
Developing GWR Packages
For developers of the GWR packages both stable and nightly Rust toolchains
are required, as well external tools such as cargo-deny, cargo-about
cargo-semver-checks, Cocogitto, prek, Prettier, and Release-plz. All
of the required development dependencies can be installed by running:
./.github/actions/install-dev-dependencies/install.sh
important
To ensure that the correct Rust toolchain is used the script must be executed from within the GWR directory.
tip
Although the script is interactive, selecting the default option (Enter) at every step is a reasonable choice and will result in a working environment.
note
Some of the actions taken by the script may request elevated permissions via
sudo.
Finally the Git hooks need to be installed within the cloned copy of the GWR repo:
prek install
Branching the Repo
Changes to GWR packages are developed on branches separate to main (the
default) branch of the repo, and then incorporated when complete via a pull
request. Long running or collaborative development will likely benefit from
having the branch pushed to the origin well in advance of when a pull request
may be opened, and doing so will cause the CI workflows to be run on every
commit.
For short lived branches pushed only at the point of opening a pull request the
branch naming prefix pr- should be used, for example, pr-new-example-app.
Branches named with this prefix will still cause the pull request specific CI
workflow to run, but will avoid the push specific CI workflow from running until
the point they are merged.
Committing a Change
All commits made to the GWR repo must follow the Conventional Commits 1.0.0 specification. This allows the automatic generation of both a top-level changelog covering the whole workspace as well as an individual changelog for each package within the workspace.
When writing a commmit message in this form:
-
The set of
types that should generally be used can be found in thecommit_parsersarray within therelease-plz.tomlconfiguration file. This array also details the sections each type will be included in within the changelog. -
The
optional scopeshould be used to detail the name of the updated package. For example:fix(gwr-developer-guide): check for panic when running mdBook tests- If the change applied to multiple, but not all packages, the names should be
comma seperated. For example:
feat(gwr-track,gwr-spotter): capnp binary file support - If the change applies to all Rust packages, infrastructure, CI, or general
configuration the scope can be omitted. For example:
docs: add example use for all public APIsinfra: set default pre-commit hooks to install
- If the change applied to multiple, but not all packages, the names should be
comma seperated. For example:
During the commit process a number of different hooks will be invoked by prek:
- The Cocogitto tool is used to lint the text of the commit message, ensuring that it adheres to the Conventional Commits specification.
- All packages within the workspace will be checked for adherence to proper
semantic versioning using cargo-semver-checks.
- As this can be a time consuming set of checks to run, by default, they are only performed by the CI system.
- The checks can be run locally with:
prek run --all-files cargo-semver-checks
- All dependencies will be checked for vulnerabilities and compatible licensing using cargo-deny.
- The licenses of all dependencies will collated and included in the licenses.html file using cargo-about.
- Source files will be formatted using
rustfmt, Prettier, and builtin hooks included with prek. - Links in Markdown source will be validated using lychee.
- Rust source will be linted using clippy (via the
cargo clippy-strictalias). - Rust source will be compiled using
cargo check.
Making a Release
The release process for all packages within the GWR workspace is handled by the Release-plz tool.
To start the release process, run:
release-plz release-pr
which will bump the version numbers of any updated packages and update the package CHANGELOG.md files as required. These changes will be automatically committed and a pull-request opened on Github for the proposed release to be reviewed.
Once the pull-request has been approved and merged the release process is completed by running:
release-plz release
which will tag the repo marking the correct commit with the versions for each
updated package, and automatically publishes the updated packages using
cargo publish and as Github releases.
Advanced Setup
sccache
sccache is a compiler cache that supports Rust and other languages, and its use helps to decrease the build times of GWR packages under many circumstances.
Installation
sccache can be installed using system package manages or via Cargo:
cargo binstall --disable-telemetry --locked sccache
Configuration
Cargo
Cargo must be configured to use sccache via the rustc-wrapper setting. This can be set via an environment variable or via a configuration file.
To config Cargo globally to use sccache add the following to
$HOME/.cargo/config.toml:
[build]
rustc-wrapper = "/Users/<username>/.cargo/bin/sccache"
note
This assumes that sccache has been installed with Cargo. Update the path to the sccache binary if appropriately if a system package manager has been used.
sccache
By default sccache requires absolute path matches to achieve a cache hit. This can be mitigated by setting SCCACHE_BASEDIRS appropriately.
For example, assume that the GWR repo will be checked out in the directory
Volumes/projects/gwr and various worktrees will be created as subdirectories
within the Volumes/projects/gwr-wt directory. To configure the basedirs such
that multiple checkouts and worktrees of the GWR repo in these directories can
all share a cache the following is required:
basedirs = ["/Volumes/projects/", "/Volumes/projects/gwr-wt/"]
On MacOS this config should be written to
$HOME/Library/Application\ Support/Mozilla.sccache/config.
Status
To see the current cache status run:
sccache -s
Caveats
Users
Care must be taken when to avoid running Cargo commands as different users when
sccache is configured. To avoid using sccache for certain Cargo commands set
RUSTC_WRAPPER = "", for example, when using sudo:
sudo RUSTC_WRAPPER="" cargo ...
Agents
Tools such as Codex can run Cargo in environments where sccache is not avaliable resulting it unexpected failures for agents.
To avoid Codex attempting to run Cargo commands with sccache the following can
be added to $HOME/.codex/config.toml:
[shell_environment_policy]
set = { RUSTC_WRAPPER = "" }
Workspace
All of the Rust packages that make up the GWR project are contained within a single Cargo Workspace. This allows build and test commands to be run across all packages together, as well as for ensuring packages share common versions of dependencies.
The toplevel Cargo.toml controls the workspace, and lists all included
packages in the workspace.members field.
Rust
Rust is the chosen language for GWR for a number of reasons.
- Strongly typed.
- Helps enforce more rigorous software design.
- Fast compiled code.
- Should produce applications that run as quickly as possible.
- Prevents unsafe code.
- Improves the quality and robustness of our models. Up front cost that should save time overall.
- Good
asyncprogramming support.- Rust is still evolving around async support, but provides what we need now.
- Excellent build system.
- Integrated documentation, tests, benchmarking.
- Easy integration with 3rd party libraries.
- Crates provide access to many high-quality 3rd party libraries.
The objective is to allow us to write larger models where the tools provide more compile-time checks.
Learning Rust
Here is a list of a few materials it might be worth going over to get an introduction to Rust:
-
The Rust Book is one of the best introductions around and worth working through to understand most of the concepts.
-
Rust: A Better C++ Than C++ is a good site for those more familiar with C/C++ covering the differences of Rust`.
-
asyncis one of the areas of the language that is still being developed, but is core to the GWR engine. Here is an introductory video covering async, and a more advanced video on async. -
Finally, this is a good video that shows the power of what Rust can do help design a good interface.
It is also worth being aware of The Rust Playground which allows you to play with Rust without installing it locally (like the Godbolt Compiler Explorer).
Useful Commands
The Rust toolchain provides a number of useful commands that it is worth being aware of.
Note: The following command should all support --help for more
information.
Build
The default way to build GWR.
cd gwr/
cargo build
Or cargo build --release to create a release binary.
A quicker version of the command while you are developping is:
cargo check
This runs all the commands needed to compile the code and report errors without actually producing the binaries.
Open the Documentation
The GWR libraries and APIs are documented using rustdoc. The documentation
can be built and opened with:
cargo doc-gwr --open
The documentation can also be generated to include private items, which can be useful when developing GWR packages, by running:
cargo doc-gwr-dev --open
Run the Tests
This command runs all the tests, including compiling and running any snippets in the documentation.
cargo test
Run the Benchmarks
There are a number of benchmarks that have been written to be able to understand the impact of changes on the performance of core components within the engine.
cargo bench
Formatting the Code
There is no need to manually format your code as the Rust tools provide a tool for this that keeps all of the codebase in a consistent format.
This is usually be done using the stable toolchain:
cargo fmt
But for developers of the GWR packages use of the nightly toolchain is required:
cargo +nightly fmt
Helper tools
The clippy tool provides some static analysis tools that help to highlight
redundant or not rust-like code that should be refactored:
cargo clippy
The GWR workspace provides an alias that runs clippy with additional lint
groups enabled, which is used by the git hooks and CI system:
cargo clippy-strict
Expand
In order to see the pre-processed output the expand tool can be used. It first
needs to be installed with:
cargo install cargo-expand
and then is run using:
cargo expand
Flamegraphs
Flamegraphs are helpful to analyse where the application is spending all of its time. The simple way to use this is to install it:
cargo install flamegraph
And then it can be run against binaries, tests, benchmarks. This is an example
commandline for running it against the flakey-component binary with a few
arguments.
CARGO_PROFILE_RELEASE_DEBUG=true sudo RUSTC_WRAPPER="" cargo flamegraph --bin flaky-component -- --num-packets 500000
Note: This must be run with as root when running on macOS.
Note: This is usually most useful against the release build.
Profiling
Developing on MacOS
The XCode Instruments profiling tools can be used via the cargo-instruments crate. To install it:
xcode-select --install
cargo install cargo-instruments
The list of templates describes the preconfigured set of probes avaliable which can be enabled during the profiling run. The current list of avaliable templates can be shown with:
cargo instruments --list-templates
For example to profile memory allocations in the flakey-component binary,
running:
cargo instruments --template Allocations --time-limit 2000000 --bin flaky-component -- --num-packets 500000
will capture a trace file and open with the Instruments GUI.
Code Coverage
Generating Code Coverage
There is a recipe provided for generating code coverage for all the tests in the test suite:
cargo run -p gwr-terminus -- run --recipe gwr-code-coverage/recipes/coverage.yaml
If needed, the recipe will tell you what tools to install and how. The recipe also prints the location of the HTML coverage report it generates so that you can open it in a browser of your choosing.
diff-coverage
If you want to compare the coverage from two runs or worktrees then you can use
the diff-coverage tool. This is a utility for showing the differences between
coverage reports. This tool compares llvm-cov JSON output files.
Summary reports show just the overall summary and per-file summaries:
cargo run --bin diff-coverage -- [BEFORE_PATH]/summary.json [AFTER_PATH]/summary.json > diff.md
Full reports add details of how the line coverage has changed within each of the source files with annotated code listings:
cargo run --bin diff-coverage -- [BEFORE_PATH]/details.json [AFTER_PATH]/details.json > full_diff.md
Within the full reports the line coverage changes are shown with a context of
unchanged lines. Use -C/--context to change the number of lines in the
context.
note
The diff-coverage tool returns non-zero if the coverage has degraded in
any way. That is to say if any of the percentages have dropped.